


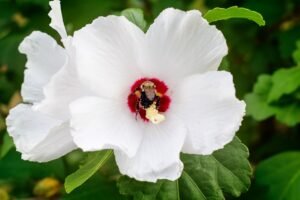
Hollyhocks, with their tall stalks and vibrant blooms, have been a beloved addition to gardens for centuries. These stunning flowers are native to Asia and Europe and have a long history of cultivation. They are known for their large, showy flowers that come in a wide range of colors, including pink, red, yellow, white, and purple.
Hollyhocks are a great addition to any garden for several reasons. First and foremost, they add a pop of color and visual interest to any landscape. Their tall stalks can reach heights of up to 8 feet, making them an excellent choice for creating vertical interest in the garden. Additionally, hollyhocks are versatile and can be used in a variety of garden styles, from cottage gardens to formal landscapes.
Key Takeaways
- Hollyhocks are a beautiful and versatile flower that can add color and height to any garden.
- Choosing the right location with full sun and well-draining soil is crucial for optimal growth and bloom.
- Preparing the soil with compost and fertilizer can help ensure healthy and robust plants.
- Planting hollyhock seeds in the fall or early spring and keeping the soil moist can increase germination rates.
- Caring for hollyhocks involves regular watering, fertilizing, and pruning to promote healthy growth and prevent disease.
Choosing the Right Location for Your Hollyhocks
When selecting a location for your hollyhocks, it’s important to consider their sunlight and soil requirements. Hollyhocks thrive in full sun, so choose a location that receives at least 6-8 hours of direct sunlight per day. They also prefer well-draining soil that is rich in organic matter.
In addition to sunlight and soil requirements, there are other factors to consider when choosing a location for your hollyhocks. Consider the height of the plants and make sure they won’t shade or block other plants in your garden. Also, take into account the wind patterns in your area, as hollyhocks can be prone to wind damage. Finally, consider the overall aesthetic of your garden and choose a location that will showcase the beauty of the hollyhocks.
Preparing the Soil for Optimal Growth and Bloom
Before planting your hollyhocks, it’s important to prepare the soil to ensure optimal growth and bloom. Start by testing the soil pH and nutrient levels. Hollyhocks prefer a slightly acidic to neutral soil pH, ideally between 6.0 and 7.0. If your soil is too acidic or alkaline, you can adjust the pH by adding lime or sulfur.
Once you have tested the soil and adjusted the pH if necessary, it’s time to amend the soil with organic matter. Adding compost or well-rotted manure will improve the soil structure and fertility, providing the hollyhocks with the nutrients they need to thrive. Work the organic matter into the top 6-8 inches of soil before planting.
In addition to soil amendments, it’s important to ensure good drainage for your hollyhocks. If your soil is heavy or clay-like, consider adding sand or perlite to improve drainage. This will help prevent waterlogged soil, which can lead to root rot and other problems.
Planting Hollyhock Seeds: Tips and Techniques
| Planting Hollyhock Seeds: Tips and Techniques | |
|---|---|
| Seed Depth | 1/4 inch |
| Seed Spacing | 12-18 inches |
| Germination Time | 10-14 days |
| Soil Type | Well-draining, fertile soil |
| Sun Exposure | Full sun to partial shade |
| Watering | Regularly, keeping soil moist but not waterlogged |
| Fertilizer | Apply a balanced fertilizer every 4-6 weeks |
| Height | 4-8 feet |
| Bloom Time | Summer to early fall |
| Special Features | Attracts butterflies and hummingbirds |
Hollyhock seeds can be planted directly in the garden or started indoors and transplanted later. The best time to plant hollyhock seeds is in early spring, after the danger of frost has passed. Choose a sunny location with well-draining soil for planting.
To start hollyhock seeds indoors, sow them in seed trays or pots filled with seed starting mix. Press the seeds lightly into the soil and cover them with a thin layer of vermiculite or fine sand. Keep the soil moist but not waterlogged, and place the trays or pots in a warm location with indirect sunlight.
Once the seedlings have developed their second set of true leaves, they can be transplanted into individual pots or directly into the garden. When transplanting, be sure to space the seedlings at least 18-24 inches apart to allow for proper air circulation and growth.
Caring for Your Hollyhocks: Watering, Fertilizing, and Pruning
Hollyhocks have moderate water requirements and should be watered deeply but infrequently. Water the plants at the base, rather than overhead, to prevent fungal diseases. Allow the soil to dry out slightly between waterings to avoid overwatering.
Fertilizing hollyhocks is important for promoting healthy growth and abundant blooms. Apply a balanced fertilizer, such as a 10-10-10 or 14-14-14, in early spring before the plants start to bloom. Follow the package instructions for application rates and frequency.
Pruning hollyhocks is not necessary for their overall health, but it can help promote bushier growth and prevent the plants from becoming top-heavy. Deadheading, or removing spent flowers, will also encourage the plants to produce more blooms. Cut the flower stalks back to the base of the plant once they have finished blooming.
Protecting Hollyhocks from Pests and Diseases
Hollyhocks are susceptible to a few common pests and diseases that can affect their growth and bloom. Aphids, spider mites, and Japanese beetles are some of the pests that can infest hollyhocks. To control these pests, you can use insecticidal soap or neem oil, or introduce beneficial insects like ladybugs or lacewings.
Fungal diseases such as rust and powdery mildew can also affect hollyhocks. To prevent these diseases, avoid overhead watering and provide good air circulation around the plants. If you notice signs of fungal infection, such as yellow or brown spots on the leaves, treat the plants with a fungicide according to the package instructions.
Propagating Hollyhocks: How to Divide and Transplant
Hollyhocks can be propagated through division, which involves separating a mature plant into smaller sections and transplanting them to new locations. The best time to divide hollyhocks is in early spring or late fall, when the plants are dormant.
To divide hollyhocks, dig up the entire plant and gently separate the root clumps into smaller sections. Each section should have at least one healthy shoot and a portion of the root system. Replant the divisions in well-prepared soil, making sure to space them at least 18-24 inches apart.
Transplanting hollyhocks can also be done by moving seedlings or established plants to new locations. When transplanting, be sure to dig a hole that is large enough to accommodate the root system of the plant. Water the transplanted hollyhocks thoroughly after planting to help them establish.
Enjoying the Different Varieties and Colors of Hollyhocks
Hollyhocks come in a wide range of varieties and colors, allowing you to choose the perfect ones for your garden. Some popular varieties include ‘Majorette’, which has double flowers in shades of pink, red, and white; ‘Blacknight’, which has deep purple-black flowers; and ‘Peaches ‘n Dreams’, which has soft peach-colored blooms.
When selecting hollyhock colors for your garden, consider the overall color scheme and aesthetic you want to achieve. Bright, bold colors like red and yellow can create a vibrant and energetic atmosphere, while softer pastel colors like pink and lavender can create a more calming and romantic feel. Mixing different colors together can create a beautiful and dynamic display.
Using Hollyhocks in Your Garden Design: Ideas and Inspiration
Hollyhocks can be used in a variety of creative ways to enhance your garden design. Their tall stalks make them an excellent choice for creating vertical interest or adding height to a border or flower bed. Plant them along fences or walls to create a stunning backdrop for other plants.
Hollyhocks also work well in cottage gardens, where their old-fashioned charm and vibrant colors can create a nostalgic and romantic atmosphere. Pair them with other cottage garden favorites like roses, delphiniums, and foxgloves for a truly enchanting display.
For a more formal garden design, hollyhocks can be used to create structured lines or focal points. Plant them in rows or clusters to create a sense of order and symmetry. Their tall stalks can also be used to frame entrances or pathways, drawing the eye and creating a sense of anticipation.
Harvesting Hollyhock Seeds for Future Planting
Hollyhock seeds can be harvested in late summer or early fall, once the seed pods have dried and turned brown. To harvest the seeds, cut the seed heads from the plant and place them in a paper bag. Allow the seed heads to dry completely in a cool, dry location.
Once the seed heads are dry, gently crush them to release the seeds. Remove any debris or chaff from the seeds by sifting them through a fine mesh sieve. Store the seeds in a cool, dry place in an airtight container until you are ready to plant them.
When planting hollyhock seeds in the future, follow the same steps as outlined earlier for starting seeds indoors or planting them directly in the garden. By harvesting and saving your own hollyhock seeds, you can continue to enjoy these beautiful flowers year after year.
Hollyhocks are a beautiful and versatile flower that can add color and visual interest to any garden. By choosing the right location, preparing the soil, and providing proper care, you can ensure that your hollyhocks thrive and bloom abundantly. Whether you choose to grow them in a cottage garden or a formal landscape, hollyhocks are sure to make a stunning addition to your outdoor space. So go ahead and plant some hollyhocks in your garden and enjoy their beauty for years to come.
If you’re interested in hollyhocks and their potential health benefits, you might also want to check out this fascinating article on the link between iodine levels and men’s testosterone levels. It explores how iodine deficiency can impact hormone production and offers insights into maintaining optimal testosterone levels. To learn more, click here: The Link Between Iodine Levels and Men’s Testosterone Levels.


+ There are no comments
Add yours